
Orchard Establishment

Ideal Climatic Conditions
- Commercial avocado cultivars are best suited to cool subtropical conditions
- Average daily temperatures between 20 – 25°C
- Light frost can be tolerated but not during flowering and fruit set
- Average temperatures during flowering and fruit set should preferably be above 18°C
- Cultivars in increasing order of sensitivity to cold temperatures are: Maluma, Edranol, Lamb Hass, Hass, Pinkerton, Fuerte and Ryan
- High humidity is desirable, especially during flowering and fruit set
- A well distributed rainfall in excess of 1000 mm p.a. is desirable
- Dry periods during flowering will require supplementary irrigation
Water Usage & Legislations
Supporting Documents:
Ideal Soil Conditions
- Soil should be well drained, without any impervious layers that could result in water logging or impeded root penetration
- Click here for more information on soil
- Good soil aeration is important
- Soil should preferably have a high water holding capacity (20 – 40% clay)
- Avocados can be successfully grown in soils with low water holding capacity if irrigation is well managed
- High rainfall naturally lead to soil acidification
- Optimum pH enhance cation exchange capacity in soil
- Norm: Subsoil pH (H2O / KCl) = 5.8 – 6.5 / 4.8 – 5.5
- Pre-plant: Calcitic lime if the Ca : Mg ratio < 2
- Lime applications can be done every 1-2 years at 1-2 ton/ha to counteract re-acidification of the soil by acidifying fertilisers, rainfall or irrigation
- The following soil forms are ideally suited to avocado production:
Inanda, Hutton, Clovelly, Magwa and Kranskop
Adverse Soil - Problem Solver
Sub-optimal soil characteristics can be overcome to some extent by:
- short cycle irrigation
- drainage canals
- deep ploughing
- planting on ridges
- wide, deep planting holes prepared with organic material
- Before embarking on such activities, the long-term economic implications of these activities should be determined.
Soil Ridging Guidelines
Ridges are commonly constructed during soil preparation phase in the establishment of avocado orchards. Ridges serve the dual purpose of increasing soil depth whilst improving soil water relations and gas-exchange. It does the latter by preventing or limiting periods of waterlogging, increasing the soil surface area for gas-exchange and diffusion, and the prevention of re-compaction due to wheel-traffic. Phytophthora thrives in poorly drained, anaerobic and compacted soils. Ridging can alter soil conditions favourably to reduce anaerobic conditions and the concurrent incidence of Phytophthora root rot. However, poor practices during the construction of ridges can increase soil erosion, cause interrow waterlogging and recompact the soil in the tree rows. Below are some guidelines for the planning and construction of ridges:
Ridges can be constructed on soils with an incline of 20 % or less. Do not build ridges on steeper slopes. Contour terracing could be considered in these conditions.
Planting density, soil type and irrigation system are important determinants for ridge size and shape. Build wider ridges (with 2.0-3.0m ridge tops) on wider spacings (where trees will have bigger canopies), where there are lighter soils, and where low-flow drip irrigation will be used. Narrower ridges (1.5-2 m) can be considered in higher density and heavier soils.
Required ridge height is determined during the soil survey phase and will depend on undisturbed effective rooting depth, depth of restrictive layers and soil volume available for ridging. Ridge height reduces the maximum allowable tree height and should also be considered.
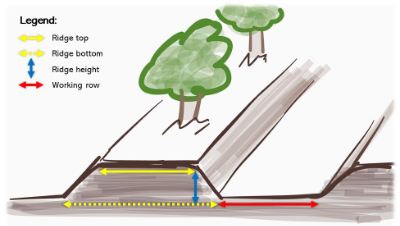
To ensure stable ridges, the maximum ridge slope of 1:1 should not be exceeded.Always take the contour into account during ridge construction; ridges must be designed to a gradient of 1,0 % to 2,5 % to prevent waterlogging in the interrow. Steeper gradients could result in serious soil erosion.
Cutting contours through ridges to allow for surface water movement are required if ridges are constructed in a fixed direction. Natural waterways should always be respected.
Ridges are typically constructed by chained tractors (e.g. bulldozers or excavators).
- Excavators allow ridging at steeper inclines than bulldozers.
- Do not use graders or ploughs to ridge as wheel/grader traffic from these implements recompact the area under the ridge. A rule of thumb to remember is that the first tractor tyre creates 70% of the compaction.
- Contour makers that pull ridges directly behind tractors should be used only if the tractor is big enough to straddle the completed ridge.
- More recently successful ridge construction is sometimes achieved with V-shaped bladed or roam plough Aeroplane- or “Aardvark”- type ridge makers that push soil from the work-rows onto the plant rows.
Soil horizons with abrupt changes in sand or clay content (i.e. highly luvic soils) should never be mixed: moving clay-rich subsoils to the surface can render the surface impermeable to water. It is also critical where saline subsoils occur, that these deeper layers should not be brought to surface (i.e. in some areas in KZN and the Southern and Eastern Cape).
Ridging by excavator is preferred where shallow soils or abrupt horizon changes are present, as it allows the operator to meticulously control the depth to which material is collected and added onto the ridge. Excavators are more efficient in mixing stratified soil profiles in cases where it is required.
Construct ridges at the same soil moisture content as what is ideal for ripping.
Chemical soil amelioration should be done with the total volume of the soil in mind and not only for the top 300-400mm that is normally ameliorated in un-ridged plantings. Sometimes double the volume of chemical ameliorants could be required compared to flat plantings.
Establish cover crops that will stabilise both the soil and ridge.
Allow ridges to settle before planting.
Soil Sampling
Soil analyses are vital to avocado management as it can give an indication of the available nutrients in the soil. Leaf analyses can give an indication of the current nutrient status of the tree.
To take a soil sample, you will need the following:
- Wheelbarrow
- Soil Auger
- Clean bucket
- Clean sampling bags
- Labels / Marker
Procedure:
- Take soil samples at the same time as leaf samples (Feb-Apr) from similar soil types in the orchard.
- Do not take soil samples within a week of fertilising.
- Have the fraction sand, silt and clay analysed for every different soil type on the farm (also used to determine the soil type).
- Soil samples should be taken at the same indicator trees as where the leaf samples are taken.
- Use the same tree to take samples every year.
- Mark the sample trees clearly.
- Clear the soil from any mulch or fertiliser before the sample is taken.
- Take the soil sample midway between tree trunk and canopy drip line at a depth of 15 – 30 cm deep (topsoil) and 35 – 55 cm deep (subsoil)
- Subsoil samples are only important if acidity is suspected
- Always keep topsoil and subsoil samples separate.
- Combine at least 10 samples (from underneath 10 of the 20 leaf sampling trees) into a ± 1 -2 kg strong, clean plastic bag.
- Keep the sample cool and marked clearly with the farm name, reference to the orchard, sample number and sample date.
- Take the soil samples to the same laboratory every year and send them in for analyses as soon as possible.
Reference: R. A. Abercrombie. 2011. “Fertilization” In: The cultivation of avocado. Ed. E. A. de Villiers & P. H. Joubert. ARC-Institute for Tropical and Subtropical Crops, p. 142-144.
Leaf Sampling
- Healthy, fruit bearing trees should be sampled separately from stressed, non-bearing trees.
- Sample trees should represent an area with homogenous soil type and microclimate.
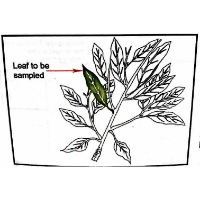
- Take leaf samples from terminal, non-bearing branches that do not show signs of a new flush and leaf samples should preferably have been exposed to direct sunlight.
- Collect 6 – 8 month old leaves (see illustration).
- Sample in the morning after dew has dried off.
- Mark sample trees clearly and use the same marked trees year after year and also for taking soil samples.
- Collect 4 leaves per tree at shoulder height so that there are roughly 80 leaves per sample representing a block that is not larger than 3 ha.
- Sample randomly (across the orchard) in the block from 20 trees on ≤ 3 ha.
- Sample different soil types, tree ages and cultivars separately.
- Keep the sample cool and send it to the laboratory within 24 hours of sampling.
- Place leaf samples in a paper bag or perforated plastic bag that is clearly marked with the farm name, reference to the orchard, sample number and sample date.
- Take the leaf samples to the same laboratory every year and send it in for analyses as soon as possible.
Reference: R. A. Abercrombie. 2011. “Fertilization” In: The cultivation of avocado. Ed. E. A. de Villiers & P. H. Joubert. ARC-Institute for Tropical and Subtropical Crops, p. 142-144.
Organic Matter
Why is organic matter so important?
- Provide aerobic conditions and a source of carbon to the soil system
Application information
- Apply before root flushes twice a year
- 1% organic matter = ± 30 kg N / ha / yr
- Supplied through mulch and by filling trenches with compost
Compost
There are a number of ways that compost can be made. In thermal composting, microorganisms such as fungi and bacteria break down organic matter, consuming oxygen and producing humus, while releasing heat, carbon dioxide and water.
Composting proceeds through three basic phases:
1. Mesophyllic / moderate temperature phase
2. Thermophyllic / high temperature phase
3. Cooling / maturation phase
Microorganisms responsible for degradation of organic matter include bacteria, actinomycetes, fungi and protozoa. Initial decomposition is carried out by mesophyllic microorganisms, which quickly break down soluble and easily degradable compounds. This process produces heat that rapidly raises the compost’s temperature.
When compost temperatures reach about 40°C, mesophyllic microorganisms become less competitive and they are replaced by the thermophyllic group of
microorganisms. During this stage the high temperatures help to accelerate the breakdown of proteins, fats and complex carbohydrates like cellulose and
hemicellulose, which are the major structural components in plants.
When the supply of these high-energy compounds is exhausted, the composts temperature decreases and mesophyllic microorganisms take over for the final maturation phase.
CLICK HERE to download the Excel spreadsheet
How to plant a tree
Replanting Old Avocado Orchards
- Replanting in old avocado orchards (Subtrop Journal, Vol. 5. Pg. 28, 29)
- Rest the soil for 1-2 years and plant a green mulch that can later be incorporated.
- Treat the soil with preplant fumigants and incorporate mulch after planting.